

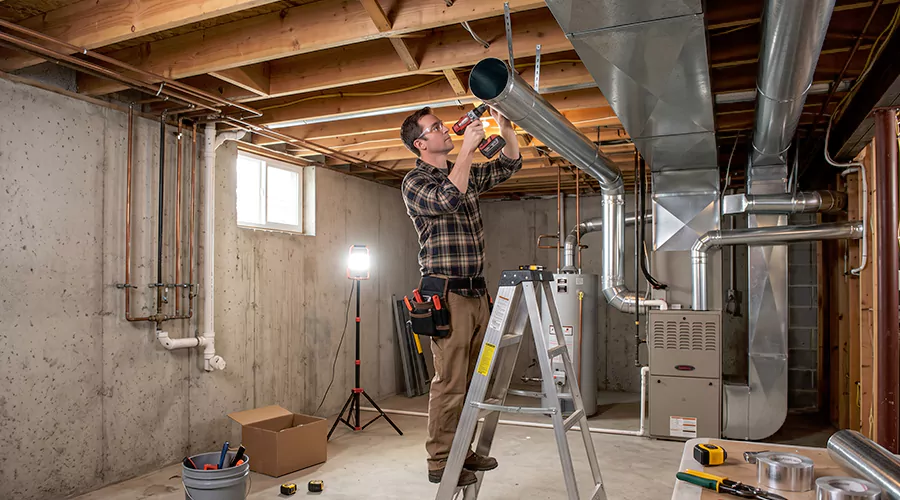
Running ductwork in a basement involves planning the supply and return routes, sizing the ducts for the HVAC equipment, positioning main trunks along suitable ceiling or wall areas, and installing properly supported branches to the room registers. Professional HVAC ductwork installation ensures all connections are mechanically secured and sealed, with appropriate insulation where required. The completed system must also be checked for leakage, airflow, and interference with other building systems.
Basements are common locations for forced-air heating and cooling ductwork because many homes have furnaces or air handlers installed on the lower level. A main supply trunk can run along the basement ceiling, with smaller branches extending toward floor registers in the rooms above. Return ducts provide a separate pathway for indoor air to reach the equipment.
An unfinished basement often makes duct installation easier because framing and mechanical connections remain visible. In a finished basement, the contractor may need to work around existing ceilings, walls, lighting, and other improvements. The duct layout must also preserve usable headroom and access to plumbing and electrical equipment.
A good basement duct system should move air efficiently without interfering with the building structure. Poorly positioned trunks can reduce ceiling height unnecessarily, while undersized branches may create noise and weak airflow. Careful planning is particularly important when the basement will later be converted into finished living space.
Where Should Ductwork Run in a Basement?
Basement ducts are commonly routed near ceiling joists because this allows the distribution system to reach rooms above without occupying large amounts of floor space. Main supply and return trunks may run along a central area, with branches extending outward to the intended registers. The exact arrangement depends on the home's floor plan and the location of the HVAC equipment.
The contractor should identify routes that avoid structural beams and minimize unnecessary changes in direction. Plumbing, electrical wiring, and other mechanical systems can limit the available space. A duct should not be squeezed into an unsuitable opening simply because the route appears convenient.
When the basement will be finished, the location of future walls and ceilings should also be considered. Installing the trunks along one planned soffit can sometimes reduce the amount of ceiling area affected. However, the final layout must still provide adequate airflow and maintenance access.
Common Basement Duct Routing Options
| Routing Method | Common Application | Main Consideration |
|---|---|---|
| Beneath ceiling joists | Large supply or return trunks | Preserves proper duct dimensions but reduces headroom |
| Between open floor joists | Certain designed branch runs | Limited by framing and available clearance |
| Along a central basement corridor | Main distribution route | May be concealed in a planned soffit |
| Inside a finished ceiling soffit | Basement renovations | Requires access and appropriate enclosure details |
| Along a basement wall | Selected trunk or vertical connections | Must not interfere with utilities or room use |
| Through a dedicated chase | Connections between floors | Requires approved penetrations and fireblocking |
A contractor should compare the routes before selecting duct materials. A rigid rectangular trunk may fit beneath joists more appropriately than a large round duct, while an insulated flexible branch may work in an open area with sufficient support clearance.
Should Basement Ductwork Run Between Floor Joists?
Some duct branches can be installed between floor joists when enough clearance is available and the construction permits it. The passage must retain its required cross-sectional area and should not interfere with plumbing or wiring. Structural framing should remain intact unless an approved modification has been designed.
Running a full-size duct between joists is different from using the empty joist cavity itself as the duct. The Department of Energy recommends fully ducted air distribution pathways rather than relying on ordinary building cavities because those spaces can be difficult to air seal and may communicate with unwanted areas.
Certain building codes permit limited use of framing cavities as return-air plenums under specific conditions. However, these arrangements must comply with restrictions concerning fire-rated construction, exterior walls, and cavity sealing. Installing a separate sealed duct generally provides a more predictable air passage.
If the required duct cannot fit safely between joists, a planned soffit may be preferable to reducing the duct size.
What Type of Ductwork Is Best for a Basement?
Rigid sheet metal is commonly used for main basement supply and return trunks. It maintains its shape and can be fabricated into rectangular sections that fit beneath framing. Round metal ducts and insulated flexible ducts may also be appropriate for selected branches.
Material selection should be based on airflow and routing requirements. Flexible ducts can follow gentle curves but should not be compressed into narrow spaces. Metal ducts require secure fittings and should be supported independently rather than resting on nearby pipes.
| Duct Material | Suitable Basement Use | Installation Consideration |
|---|---|---|
| Rectangular sheet metal | Main supply and return trunks | Custom sizing and suitable hangers |
| Round sheet metal | Branches and selected trunks | Proper elbows and transitions |
| Insulated flexible duct | Approved branch connections | Wide supports and gentle bends |
| Fiberglass duct board | Certain approved duct sections | Moisture and physical protection |
| Metal register boots | Floor or wall outlet connections | Secure attachment and air sealing |
| HVAC mastic or listed closure products | Duct seams and fittings | Proper surface preparation and compatibility |
Basement moisture conditions also influence material choices. A damp basement can contribute to corrosion or condensation problems when ducts are poorly protected. Addressing water intrusion and insulation requirements helps preserve the finished installation.
How Do You Size Ductwork for a Basement?
Duct size depends on the airflow required by the HVAC equipment and the rooms being served. The main supply trunk typically carries air for several branches, while each branch carries the amount needed by a particular outlet. Return ducts must also provide enough capacity to move air back toward the blower.
ACCA Manual D provides recognized residential duct design methods. The calculations account for pressure losses through duct materials, lengths, elbows, and fittings. A contractor may also use room-by-room load calculations to establish the intended airflow distribution.
A basement trunk should not be reduced in size arbitrarily to fit above a finished ceiling. Narrowing the passage without a design review may increase static pressure and cause noise or reduced airflow. The available space should be planned around the duct dimensions whenever possible.
How to Run Ductwork in a Basement Step by Step?
The following steps describe a typical professional basement duct installation. The specific sequence depends on whether the basement is unfinished, being renovated, or receiving a new HVAC system. Work near electrical equipment, fuel-burning appliances, and structural framing should be handled by qualified personnel.
Step 1. Inspect the Basement Layout
Begin by identifying the location of the furnace or air handler and the existing supply and return connections. Check ceiling framing, beams, plumbing, electrical wiring, and available headroom. The installer should also identify where branches will connect to floor registers or other room openings.
In a finished basement, note the location of existing soffits and access panels. Any planned renovation should be reviewed before duct routing begins. The layout needs to serve both the mechanical system and the intended use of the space.
Step 2. Identify Moisture and Safety Problems
Inspect the basement for standing water, active plumbing leaks, or damp insulation. These conditions can affect duct materials and may create safety concerns during installation. Water problems should be corrected before new ducts are enclosed.
The contractor should also check for unsafe electrical conditions and suspected hazardous older insulation. Older duct wrapping may need assessment for asbestos before disturbance. Ordinary duct work should not proceed through materials that require specialized handling.
Step 3. Determine Heating and Cooling Requirements
Calculate the airflow required by the rooms served by the new network. This may include rooms on the first floor and any basement spaces intended to receive conditioned air. The design should reflect the equipment's available airflow and the pressure losses through the distribution system.
A finished basement can have different heating and cooling needs from the floor above. It may remain naturally cooler in summer or experience different heat loss through foundation walls. Register locations should be based on these conditions rather than simply copying upstairs arrangements.
Step 4. Develop the Main Trunk Layout
Plan the supply and return trunks with attention to ceiling height and framing obstacles. A compact layout can reduce duct length and the number of fittings required. However, the trunk should not be reduced below the dimensions needed for airflow.
The contractor may choose a central route that serves multiple branches. In a basement renovation, a planned soffit can conceal the trunk while preserving more open ceiling area elsewhere. The finished soffit dimensions should be approved before construction begins.
Step 5. Check Structural and Building Requirements
Identify load-bearing beams, joists, and other structural elements along the intended route. Avoid cutting or notching them without an approved structural design. Ductwork should be routed around obstacles or placed beneath framing when necessary.
Local mechanical codes may require permits and inspections. Fire-rated construction, equipment clearances, and required access must also be preserved. The contractor should verify the applicable requirements before installation begins.
Step 6. Plan Supply and Return Register Locations
Mark where the supply branches will reach the rooms. Floor registers are common for first-floor spaces above an unfinished basement. Wall or ceiling registers may be suitable for finished basement rooms.
Return pathways need equal attention. Installing new supply vents without an appropriate return route can create room pressure problems. The contractor should identify the intended return openings and any necessary transfer pathways.
Step 7. Prepare the Work Area and Shut Down Equipment
Clear an appropriate working area around the proposed routes. Protect stored belongings and finished surfaces from construction debris. Ensure that ladders or working platforms can be positioned safely.
Turn off the HVAC equipment before opening existing ducts. Qualified technicians should follow electrical isolation procedures when working near equipment cabinets. Fuel-burning furnace exhaust components must not be treated as ordinary supply or return ducts.
Step 8. Install the Supply Plenum and Main Trunk
The supply plenum connects the heating or cooling equipment to the duct network. Install it using fittings and materials appropriate for the equipment and duct design. The main trunk should then be positioned along the planned route.
Rigid metal sections need suitable mechanical fasteners and supports. Their joints must remain stable before sealant is applied. The installer should also provide access to balancing dampers and other components that may need future adjustment.
Step 9. Support the Main Ductwork
Use hangers or other approved supports suited to the duct's shape and weight. Sheet metal ducts should not depend on water pipes, electrical conduit, or suspended ceiling grids for structural support unless an approved system specifically permits that arrangement. The load should be transferred to suitable building framing.
Supports should keep long trunks from sagging or moving at their joints. A properly supported system is also less likely to rattle during blower operation. The spacing and attachment method should follow the material and code requirements.
Step 10. Install Branch Takeoffs
Attach branch fittings to the main trunk at locations specified by the duct design. Each takeoff should be mechanically secure and appropriately sealed. The fitting should match the branch's required size.
A branch should not be connected simply wherever there is open space on the trunk. Takeoff position and the amount of airflow available along the main duct influence performance. The contractor should follow the designed distribution arrangement.
Step 11. Install Branch Ducts to the Registers
Route rigid or flexible branches from the main trunk to their intended register boots. Rigid ducts should use appropriate elbows and transitions. Flexible ducts should maintain gentle bends without excessive slack or compression.
If flexible ducts are suspended horizontally, Department of Energy guidance recommends wide supports no more than four feet apart, with limited sag between supports. The straps should not compress the insulation or inner liner.
Each branch should be supported so its weight does not pull against the takeoff or register boot.
Step 12. Install and Seal Register Boots
Secure floor or wall register boots to suitable framing. The boots should remain stable when registers are installed or removed. Their duct connections must be mechanically fastened and sealed.
The Department of Energy recommends sealing the gap between register boots and the surrounding floor or wall. These gaps can allow air to move between the basement, floor cavity, and occupied rooms. An appropriate seal helps maintain the intended air boundary.
Step 13. Install the Return Air Ducts
Route the return trunk and any branches back toward the furnace or air handler. The duct sizes should accommodate the required total return airflow. Return grilles should be positioned and sized according to the design.
Return connections need careful sealing because openings can draw air from unwanted basement or construction cavities. A return located near a fuel-burning appliance also requires attention to combustion safety and prohibited return-air locations.
The contractor should not connect a return directly to a garage or another unsuitable space. Applicable mechanical codes govern permissible return-air sources.
Step 14. Seal All Joints and Connections
Mechanically secure and seal the appropriate joints throughout the distribution system. Use HVAC mastic or listed closure products compatible with the duct material. Ordinary cloth-backed duct tape is not recommended for permanent duct sealing.
Pay attention to trunk seams, branch takeoffs, plenum joints, and register connections. Both supply and return leaks can affect performance. Sealing should be completed before the ductwork becomes concealed behind finished surfaces.
Step 15. Insulate Ducts Where Required
Basement duct insulation depends on whether the basement is inside or outside the conditioned thermal boundary. Ducts in an unconditioned basement may require additional insulation under applicable energy codes. Metal ducts in conditioned spaces can also need attention where condensation is possible.
Insulation should cover applicable duct surfaces and joints without major gaps. The exterior vapor barrier should remain appropriate for the installation. A contractor should evaluate basement moisture conditions rather than rely on insulation alone to correct active water problems.
Step 16. Prepare Soffits or Finished Ceiling Enclosures
If the basement will be finished, frame suitable enclosures around the ductwork after the main mechanical installation. The soffits should provide enough clearance for ducts without compressing them. Required access to dampers or equipment should remain available.
Fireblocking and fire-rated assemblies must be restored where required. A soffit should not conceal untested duct connections or obstruct electrical junction boxes that must remain accessible.
Step 17. Perform Duct Leakage Testing
Test the completed network according to applicable requirements. Duct leakage testing can identify openings at fittings that were not visible during inspection. Any defects should be repaired before the basement ceiling is closed.
ENERGY STAR recommends properly sealed ducts because leakage can reduce heating and cooling performance. In typical homes, a significant share of air moving through ducts may be lost through leaks and poor connections. Testing helps verify whether the new installation addresses that concern.
Step 18. Test Airflow and System Operation
Restore HVAC operation after all ducts and equipment connections are secure. Check register airflow and system static pressure where appropriate. Balance the duct network according to the intended distribution.
If basement rooms receive insufficient heat or cooling, the contractor should investigate branch sizing and return capacity. A register delivering some air does not necessarily mean the room is receiving its designed airflow.
Step 19. Complete Final Inspection and Documentation
Inspect the basement for loose supports, exposed sharp edges, and incomplete insulation. Verify that the ductwork does not block access to plumbing or electrical equipment. Restore building finishes and remove construction debris.
Provide the homeowner with the duct layout, material specifications, and test results when available. This information is especially valuable before finished ceilings conceal the distribution system.
How Do You Hide Ductwork in a Finished Basement?
Ductwork in finished basements is commonly concealed with soffits or dropped ceiling sections. A soffit can follow the main trunk while leaving surrounding areas at a higher ceiling level. This approach is often preferable to lowering the entire ceiling.
The soffit must provide enough space for the required duct dimensions and any insulation. The contractor should also maintain access to dampers and other components that may need adjustment. Decorative construction should not prevent future HVAC maintenance.
A planned route can help reduce unnecessary soffit length. The installation should be designed before framing begins so duct size and ceiling appearance are coordinated.
Should Basement Ducts Be Insulated?
Insulation requirements depend on the basement's thermal conditions. Ducts in an unconditioned basement commonly need insulation to limit heat transfer. A basement within the conditioned envelope may have different requirements.
Condensation is also a consideration. Cold air-conditioning ducts can develop moisture on their surfaces when exposed to humid air under certain conditions. Proper insulation and moisture control can reduce this risk.
The contractor should determine the applicable insulation rating and protective covering. Insulation should not be used to conceal leaking or damaged ducts that need repair.
Can You Use Flexible Ductwork in a Basement?
Yes, flexible ducts can be used for suitable branches when the material is permitted and correctly sized. They may simplify certain connections around framing and between rigid trunks and registers. However, they need enough space to maintain their full diameter.
Flexible ducts should not be installed with tight bends or excessive sagging. Wide support straps help preserve airflow and insulation thickness. In exposed basements with frequent storage or activity, flexible ducts may also need protection from physical damage.
Rigid sheet metal is often more suitable for long main trunks. The final selection should follow the system design.
How Much Does It Cost to Run Ductwork in a Basement?
The cost depends on whether the project involves a few branches or an entirely new distribution system. Installing exposed ducts in an unfinished basement may require less building restoration than routing passages through finished ceilings. However, duct sizing, material quantity, and custom fittings remain important cost factors.
A contractor should separate the mechanical installation from soffit framing and drywall work when those services are billed independently. Permit fees and performance testing may also affect the total. The most reliable quote is based on the actual duct layout and building conditions.
What Mistakes Should You Avoid?
Basement duct installation can create problems when the contractor prioritizes concealment over airflow or mechanical access. The following errors should be avoided.
- Reducing duct dimensions solely to preserve ceiling height.
- Cutting structural joists or beams without approval.
- Supporting heavy ducts from plumbing or electrical systems.
- Blocking furnace or air handler service access.
- Using framing cavities as supply ducts.
- Ignoring restrictions on return-air locations.
- Installing compressed flexible branches.
- Leaving trunk and boot connections unsealed.
- Omitting appropriate insulation in unconditioned areas.
- Concealing balancing dampers without access.
- Closing ceiling soffits before completing leakage testing.
- Confusing combustion flues with room-air ducts.
- Ignoring moisture or condensation problems.
- Failing to check total return airflow.
A proper installation should leave the system functional and accessible without creating structural or combustion safety concerns.
Conclusion
Running ductwork in a basement requires suitable routing, correctly sized trunks and branches, and secure connections to the HVAC equipment and room registers. Exposed basements can simplify installation, while finished basements require careful planning around soffits and existing utilities. Supply and return ducts must both be sealed and supported properly. Insulation and moisture conditions should also be evaluated before enclosing the work. Have a qualified contractor check leakage, airflow, and applicable safety requirements before the installation is complete.